Cherry Pickin’…Sorta!

Hi All,

Not too long ago I visited my family in Seattle. It’s always fun because not only is Seattle a rockin’ place, but I get to see my 18 month old grandson, Jordan.

IMG_0093

What’s not to love about that face? He’s really cute and very smart….

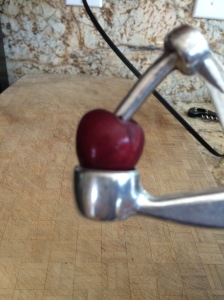
Ok, I digress! His mom and dad are really into eating healthy so a lot of his food is natural and organic. While there this time, mom was fixing fresh cherries and removing the pits. Now you know I’ve never met a tool I didn’t like, so I was fascinated by the pit remover tool she was using. I’d never seen one before, so this was new to me and I was anxious to give it a try. Who knew? It might be a must have for my ever growing kitchen tool collection!

IMG_0025

Looks like something out of a Medieval torture scene, doesn’t it?

IMG_0028

Lining it up was a bit tricky. But that’s just me.

IMG_0029

Squeeze!

IMG_0030

Tah Dah!

It does work, and I think if you have little kids and choking on pits is a concern, this is the tool to have. I’ve since seen several other pit removing tools, some fancier, some plastic, etc…but this is functional and easy to clean, and for folks like me, easy to use. Did I run out and buy one? Nope. But then, for me, part of the fun of fresh cherries is the ability to suck on the pits for a while, and I don’t have any little kids in the house. Just Zack and Zoey, my furry children.

Toodles,

Silly food pic:

IMG_1231

Back in the Kitchen!

I haven’t been able to spend any time in the kitchen lately due to a lengthy – one month, actually – trip to Europe, so I’ve neglected this blog shamefully. I’m back, and though more trips are in the plans, they are not long, so I will be cooking and trying out all sorts of equipment. In fact, yesterday I bought a new small electric tool! You just can’t have enough tools in the kitchen, right? I will give it a try in the near future and will report back.

Just because I wasn’t actually cooking doesn’t mean I wasn’t paying attention to food. I was able to sample food from several countries and I loved all of it, but I think my favorite was a Belgium Waffle we ate in Belgium. While on a tour of Bruges, we wandered off the beaten path and found a little hole in the wall that offered the waffles. It only had two seats at a small counter and the proprietor was a nice young man who seemed very pleased to have customers! The menu offered a large variety of waffles but I stuck to the basics….and I was not disappointed. It was yummy, crispy and delish! I love Belgium Waffles and this one took the cake! (pardon the pun).

Take a look!

IMG_6793

I do have a waffle maker, so I think I’m going to try to duplicate this at some point. Need to do my research because this is no ordinary waffle! And I also want to duplicate the look of ecstasy you see here!

IMG_6796 IMG_6795

I will be cooking again this week, so let’s talk later!

Toodles,

Silly picture:

IMG_1203

Not Your Mother’s Pressure Cooker

I’m always looking for new experiences and with that in mind, my partner in all cooking crimes, Chicken #1 (aka Karren) and I signed up for a cooking class at the BergHOFF culinary center.

The menu included  Roast Beef in the Pressure Cooker with Red Wine Sauce. Now I don’t know about you, but I remember my mom’s pressure cooker. You know, the one with the little metal thingy on top that rattled and jiggled as the steam built up! We were all intimidated by the big noisy pot sitting on the stove and the cautionary warnings “let the steam out first or it will explode!” Explode????

I’m sure we all have tales – I know I do – of horror stories involving these scary cooking appliances, so when I saw this on the menu, I was a little afraid. Ok, more than a little….but I figured Chef Toni knew what she was doing.

First we browned the roast in the pot, then added ingredients (I won’t go into all that here) and with a twist of the lid….set the cooking in motion. Yes, I said “with a twist of the lid”. That’s all there was to it. When the cooking was done, lower the heat, the steam automatically reduces, and with another twist of the lid, you can remove your yummy food.

51mKprmYq2L._SL1280_

This slick and shiny looking instrument is a wonder. I’m sure there are lots of good brands out there, but since this was my first experience with the new kind, I can only speak to this brand.  The roast was done in 15 minutes! Now isn’t that every cook’s dream??? My mind is full of possibilities.

It’s not noisy, nothing jiggles and I think I definitely want one!   Check one out!

Toodles,

Silly Food Picture:

IMG_1085


It’s a New Year! Eat Gum Drop Cookies!

Yup, I’m a day late (and a dollar short). Call it the holiday hangover. No, not a hangover from too much alcohol, but rather from food. Cooking it, baking it, and, of course, eating it. After the New Year was properly rung in, I left on a 9 day cruise where someone else did all the cooking and baking while I did all the eating! Holy growing waistline, Batman!

Well, it’s a new year, and I’m on to healthier waters. Americas Test Chickens are taking on some international foods starting with Indian cuisine, always a healthy option with lots of veggies and tons of interesting spices. I’ll provide some insights and helpful hints to accomplishing those recipes including testing some new equipment and some low fat alternatives. And maybe….just maybe…I’ll join Weight Watchers so I don’t have to buy a new wardrobe. I’ll let you know.

Meanwhile, back in the kitchen, I want to tell you about a not – so – minor victory I had over the holidays. First, a little history. Many years ago, my late mother – in – law used to bake these wonderful gumdrop cookies. My whole family loved them, and every year for Christmas she would gift a giant box of them to my father, who was particularly fond of them. She passed that recipe on to me (I’ve included it at the end of this posting) but for years my efforts could not produce the same puffy results as she had. They always turned out flatter than a pancake! Then one day in December, while baking cookies with a couple of friends, I mixed a batch and got ready to bake them. However, we decided to take a lunch break so I threw the bowl in the fridge. I think it was refrigerated for a little over 30 minutes before I finally put them on the cookie sheet to bake. Much to my surprise, these cookies turned out perfect! Refrigeration is apparently the key. I proceeded to refrigerate every batch prior to baking and they all turned out beautifully! Victory! Mystery solved!!!!


IMG_2986

So here’s the recipe: Remember, refrigerate the batter prior to baking – at least 30 minutes.

Gum Drop Cookies

1/2 cup butter      1/2 cup white sugar

1/2 cup brown sugar (firmly packed)

1 egg                         1tsp vanilla

1 cup all purpose flour

1/2 tsp double acting baking powder

1/2 tsp salt              3/4 cup quick cooking oat meal

1/2 cup chopped gum drops  (buy small ones, they’re easier to cut)

1/2 cup nuts

Preheat oven to 350 degrees. Grease cookie sheets. In mixing bowl, cream shortening and sugars. Beat in egg and vanilla until fluffy. Gradually add flour, baking powder and salt. Continue to mix until well blended. Stir in oatmeal then nuts and gumdrops. (refrigerate!) Drop batter by the tsp on cookie sheet 2 inches apart. Bake 12 to 14 minutes.

From my house to yours, have a happy and prosperous New Year.

Toodles,


Silly food pic:

sillyfood1


Stir it up…little darlin’…..Stir it up

Thank you, Bob Marley!  It wouldn’t be odd to hear me singing his tune while working in the kitchen –  I’ve been known to break into song now and then. Not that you’re missing anything! It’s a catchy little ditty though, isn’t it? And it’s fun to play with all things that stir!!!!

Earlier in the year I went on a whisk binge. I love whisks…any size, any color…a gal just can’t have too many! Of course to actually use one, it requires manual labor and time. Since I’m always looking for a quicker way to do things, I’ve invested in a couple…oh, ok….a few….electronic mixing thingies.

Thingy number one – my Cuisinart Smart Stick. If you’ve never used one of these, or one like it, I highly recommend it. It’s great for making whipped cream – you can whip it up right in the container you’ll use to store it. It’s also great for gravies and sauces while they’re still on the stove.

                                  IMG_5909IMG_5906

Pic above is from the Panna Cotta featured in Americas Test Chicken’s latest blog.

The second “stir it up” thingy actually does double duty. Not only is it a great mixer but also an efficient chopper. It’s my Cuisinart Food Processor. I love this machine…in fact, I think it’s the most used machine in my kitchen. If you can only afford one tool, I strongly suggest this one. It does practically everything but the dishes! On the companion blog, America’s Test Chicken, I mentioned that I didn’t chop the pound of mushrooms for the Duxelles (Boeuf en Croute episode) by hand. That’s right, I used this baby. It made short work of the chopping and took no time at all!

IMG_6137

DSCN0194

Here are the mushrooms being chopped.

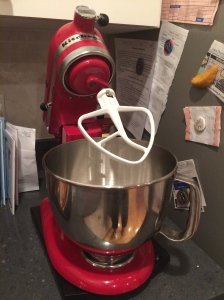
Ok. So here’s the grand daddy of them all. If you’re a baker, it’s a must have. The Kitchen Aid Stand Mixer. It comes with three different tools, a flat paddle beater, dough hook, and a wire whip.  If you want more, there are lots of attachments available. You can build this into an Uber machine!. Let’s see, there’s an apple peeler/corer, a pasta maker, a meat grinder, a spriralizer, a juicer, ice-cream maker…somebody stop me!!!!

                         IMG_6135

DSCN0292

This is my go-to  machine for batter and whipping eggs into meringue  and a lot more.

So there you have it…mixing, stirring, beating, chopping, and blending at its best, in my humble opinion.

Toodles,

Silly food picture:

sillyfood3

My Spiralizer Thingy – Swirl Your Way to Healthier Meals!

One of the reasons for loving to cook and experiment with new recipes and gadgets is the ability to create healthy or healthier versions of standard dishes.  Like Pasta!

Hey look, I’m Italian! Pasta is my life’s blood! Any size, any shape, covered in sauce, slathered in butter, drooling in Olive Oil…it doesn’t matter, it’s all good! However, we all know pasta is loaded with carbohydrates(the not so good kind), so I’ve been looking for healthier alternatives. (Don’t groan!)

Enter Zucchini pasta! Have you tried it??? I started by just finely chopping Zuchinni into thin strips. This works just fine but takes more time than I like to spend in meal prep. Then I tried this nifty little tool I found at Sur la Table

IMG_5684

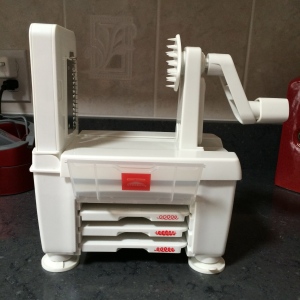
It actually works really well, but I felt like I was wasting more vegetable than I wanted. Chicken #1 mentioned that she had bought a spiralizer while living in Germany that she really liked, so while at Williams Sonoma (and yes, if you’re thinking I stalk kitchen supply and foodie stores, you’re right!) I found the right one for me. Paderno World Cuisine, 4 – blade spiralizer. I LOVE IT!

Comes neatly packed!
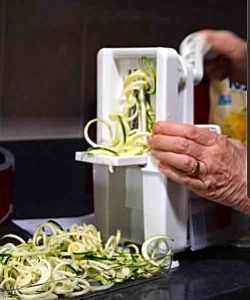
And turns into this! It's magic!
And turns into this! It’s magic!

So this is what it looks like in action! You just attached the vegetable (aka Zucchini) and turn the handle….and ta dah! Zucchini pasta!

Just turn the handle!
Beautiful!
Beautiful!
Oh so yummy!
Oh so yummy!

So that’s my story….I’ve never found a gadget/tool I didn’t love or want to own.

Toodles!